
As the holiday season approaches, there's no better way to get into the festive spirit than by adorning your nails with a touch of Christmas cheer. Christmas pudding nails are a delightful and unique way to celebrate the season, combining the warmth and tradition of a classic Christmas pudding with the creativity of nail art. In this comprehensive guide, we'll walk you through everything you need to know to create stunning Christmas pudding nails, from the tools and materials required to step-by-step instructions and tips for perfecting your design.
Introduction to Christmas Pudding Nails
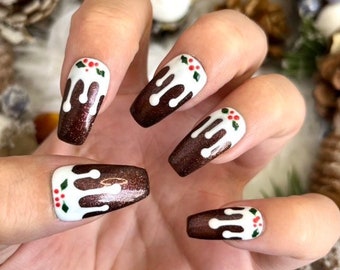
Christmas pudding nails are a fun and festive nail art design that captures the essence of the holiday season. Inspired by the rich, fruity dessert that is a staple of Christmas dinners, these nails feature intricate details that mimic the appearance of a traditional Christmas pudding. With their warm, inviting colors and playful accents, Christmas pudding nails are sure to be a hit at any holiday gathering.
Tools and Materials Needed
Before you begin, gather the following tools and materials to ensure a smooth and successful nail art session:
- Nail Polish: You'll need a variety of nail polish colors, including brown, beige, white, green, and red. These colors will help you create the base of the pudding, the cream, and the holly accents.
- Nail Art Brushes: Fine-tipped nail art brushes are essential for creating detailed designs. Look for brushes with thin, flexible bristles for precise application.
- Dotting Tools: Dotting tools are perfect for adding small, round accents, such as the berries on the holly.
- Nail Art Pens: These pens come with fine tips and are filled with nail polish, making them ideal for drawing intricate details.
- Top Coat: A clear top coat will protect your design and give it a glossy finish.
- Nail File and Buffer: To prepare your nails for the design, you'll need a nail file and buffer to shape and smooth your nails.
- Cotton Swabs and Nail Polish Remover: For cleaning up any mistakes or excess polish.
Step-by-Step Tutorial
Step 1: Prepare Your Nails
Begin by removing any existing nail polish and filing your nails into your desired shape. Buff your nails lightly to create a smooth surface for the polish to adhere to. Apply a base coat to protect your nails and provide a smooth foundation for your design.
Step 2: Create the Pudding Base
- Base Color: Apply a coat of brown nail polish to create the base of the Christmas pudding. Allow it to dry completely.
- Texture: Using a fine-tipped nail art brush, add lighter brown or beige highlights to mimic the texture of the pudding. You can create small, irregular shapes to give the pudding a more realistic appearance.
Step 3: Add the Cream
- Cream Color: Apply a thin layer of white nail polish to the top of the pudding base, leaving a small border of brown visible around the edges. This will represent the cream or custard often served with Christmas pudding.
- Blending: Use a fine-tipped brush to blend the edges of the white polish into the brown base, creating a seamless transition.
Step 4: Design the Holly
- Leaves: Using a green nail polish and a fine-tipped brush, carefully draw small holly leaves around the edge of the cream. Create pointed, slightly curved shapes to resemble real holly leaves.
- Berries: With a red nail polish and a dotting tool, add small red berries to the holly leaves. Place the berries strategically to create a balanced and visually appealing design.
Step 5: Finishing Touches
- Details: Add any final details, such as small white highlights on the berries or additional texture to the pudding base.
- Top Coat: Apply a clear top coat to seal your design and give it a glossy finish. Allow the top coat to dry completely before handling your nails.
Tips for Perfecting Your Design
- Practice Makes Perfect: Nail art requires patience and practice. Don't be discouraged if your first attempt isn't perfect. Keep practicing, and you'll improve with each try.
- Use a Light Touch: When applying detailed designs, use a light touch to avoid smudging or ruining your work.
- Clean Up: Use cotton swabs dipped in nail polish remover to clean up any mistakes or excess polish. This will help keep your design looking neat and polished.
- Experiment with Colors: Feel free to experiment with different shades and colors to create a unique look that suits your style.
Variations and Inspiration
While the classic Christmas pudding design is a timeless choice, there are plenty of ways to put your own spin on this festive nail art. Here are a few variations to inspire you:
- Glitter Accents: Add a touch of sparkle with glitter nail polish. Apply a thin layer of glitter over the cream or use glitter to create shimmering holly berries.
- Metallic Details: Incorporate metallic nail polish for a luxe look. Use gold or silver to add highlights to the pudding base or create metallic holly leaves.
- 3D Elements: For a more dimensional design, consider adding 3D elements such as small beads or rhinestones to represent the berries.
- Ombre Effect: Create an ombre effect by blending different shades of brown and beige to give the pudding base a gradient look.
Caring for Your Christmas Pudding Nails
To ensure your Christmas pudding nails look their best throughout the holiday season, follow these care tips:
- Avoid Harsh Chemicals: Keep your nails away from harsh chemicals and solvents that can damage the polish.
- Moisturize: Regularly apply cuticle oil and hand cream to keep your nails and cuticles hydrated and healthy.
- Touch-Ups: If you notice any chips or wear, touch up your design with a fresh coat of polish and a top coat to maintain its appearance.
- Professional Removal: When it's time to remove your nail art, consider visiting a professional nail technician to ensure the polish is removed safely and without damaging your nails.
Christmas pudding nails are a delightful and festive way to celebrate the holiday season. With their warm, inviting colors and playful accents, these nails are sure to be a hit at any holiday gathering. By following this step-by-step tutorial and incorporating your own creative touches, you can create a unique and beautiful nail art design that captures the spirit of Christmas.
So, gather your tools and materials, and get ready to create a festive masterpiece on your nails. Whether you're a nail art novice or a seasoned pro, Christmas pudding nails are a fun and rewarding project that will bring a touch of holiday cheer to your fingertips. Happy painting, and merry Christmas!
No comments:
Post a Comment